Quotient Native App Setup Guide
This guide provides detailed instructions to help you set up the application, ensuring all prerequisites are met and configurations are applied correctly. Please note the below steps are one time.
Thank you for installing the application from the Snowflake Marketplace.
This guide offers a comprehensive walkthrough of the application setup process. It ensures all prerequisites are fulfilled and configurations are correctly implemented. Please note that these steps are required only once.
Prequisite: Enabling multi-statement count on your Snowflake account
The MULTI_STATEMENT_COUNT parameter needs to be enabled on your Snowflake account due to the way that Quotient sends queries through the Python Snowflake Connector. To do this, please run the following command.
ALTER ACCOUNT SET MULTI_STATEMENT_COUNT = 0;For more information on this parameter please see: https://docs.snowflake.com/en/sql-reference/parameters#label-parameters-multi-statement-count
Step 1: Granting Imported Privileges on an Inbound Share from LSEG to the Application
The inbound data share from LSEG provides comprehensive global coverage of 115,000 active and inactive publicly traded entities across 150+ markets, offering extensive historical financial data, standardized statements, and industry-specific metrics dating back to the 1980s. It also includes granular company reports, per-share data, financial ratios, and point-in-time data to support back-testing and analysis of investment strategies through Quotient application. To grant read-only access, execute the below query in a SQL worksheet.
GRANT IMPORTED PRIVILEGES ON DATABASE "<DATABASE_NAME>" TO APPLICATION
"<APPLICATION_NAME>";
Note: Replace <DATABASE_NAME> with the name of the inbound data share from LSEG and replace <APPLICATION_NAME> with the name of the installed Quotient application.
Step – 2 : Granting Read-Only Access to the Quotient Data Package (inbound share) to the application
The Quotient Data Package is an essential component shared from the Scientific Financial Systems (SFS) Snowflake Account. It contains all views required for the application to function. The data displayed under the shared data section in the Quotient application’s UI is sourced from the views present in this database. Additionally, these packages include a range of security identifier mappings to support your needs. The specific content and naming of the views within the package depend on your licensed integrations (e.g., data shares from LSEG or Intrinio). You’ll notice the name follows this pattern: %QUOTIENT_DATA_ENVIRONMENT%
GRANT IMPORTED PRIVILEGES ON DATABASE "<DATABASE_NAME>" TO APPLICATION
"<APPLICATION_NAME>";
Note:
- Replace <DATABASE_NAME> with the name of the Quotient Data Package and replace <APPLICATION_NAME> with the name of the the installed Quotient application.
- The “Shared Data” section in the Quotient application becomes visible only when the native app has access to the Quotient Data Package, which is shared by Scientific Financial Systems with the application consumer. Please refer to the screenshot below.
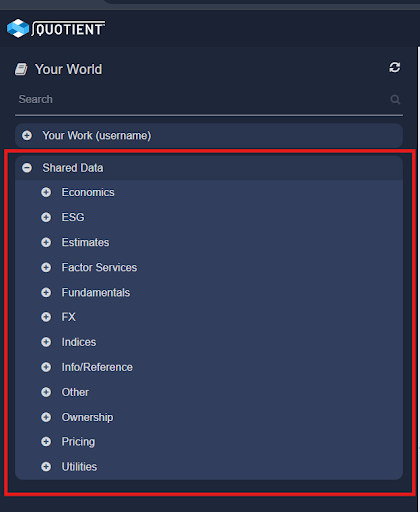
- To integrate additional data sources, please use the Data Mapper module available within the Quotient application.
Step – 3 : Granting necessary account level privileges to the application
To ensure seamless operation of the Quotient application, The application requires specific account-level privileges. To configure access permissions, please open the Quotient Application from the app section of Snowsight UI and click on the “Grant” button as shown below.
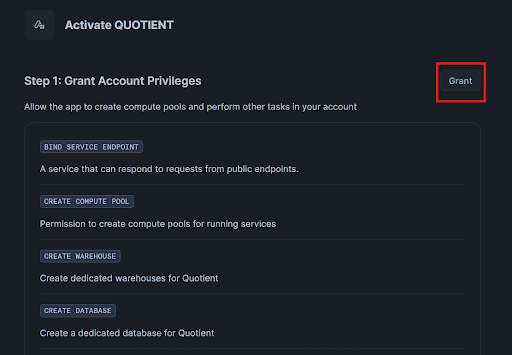
Note – When configuring the above, use a role that has the required privileges, e.g., ACCOUNTADMIN
After successfully granting the required privileges to the application, perform the external access integration setup. Please refer to the screenshot below.

The Quotient application requires access to certain external endpoints. Below is a list of the endpoints we require and how we use them.
| Jira | Issue Reporting Integration |
| AWS S3 | Automated Backups |
| AWS Secrets Manager | Accesses API tokens such as Jira |
| Sentry | Real-time issue discovery |
| Ipify | Used for backup cataloging |
Note: We do not store any user data on S3 or within our Secrets Manager. Our backup system is designed to use only metadata, ensuring that no actual financial data is stored as part of the backup process. This approach guarantees the security and privacy of sensitive information while maintaining the integrity and functionality of the system. In addition, we scrub any P.I.I. from our Sentry setup preserving anonymity.
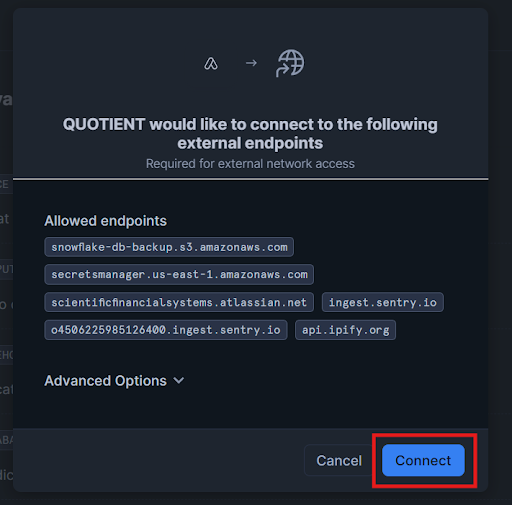
Click on connect as shown in the above screenshot to create the external access integration.
Once done, click on the launch button as shown below.

Step – 4 : Creating the Security Master View from the Streamlit UI

To access the Streamlit Admin Panel, please click on the launch app button shown above.

To create the security master view, click the ‘Create View’ button shown above. The security master view is essential for the application functionality. Please note that the security master view requires the inbound share from LSEG and is distinct from the additional security mappings provided by our Quotient Data Packages.
Step – 5 : Accessing the Quotient Application through the endpoint
To access the Quotient application, click the service status button below. Make sure the service status is set to “READY.” If it shows “In Progress,” please wait a minute and try again.
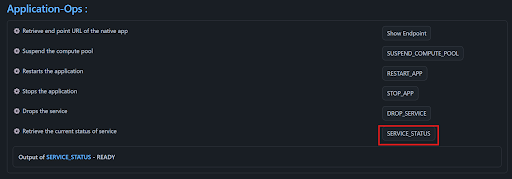
Once the service is ready, click on Show endpoint button as shown below.

Copy the endpoint URL and open it in a new browser tab. This will prompt you to log in to your Snowflake Account using your credentials. After a successful login, the Quotient UI will be displayed as shown below.
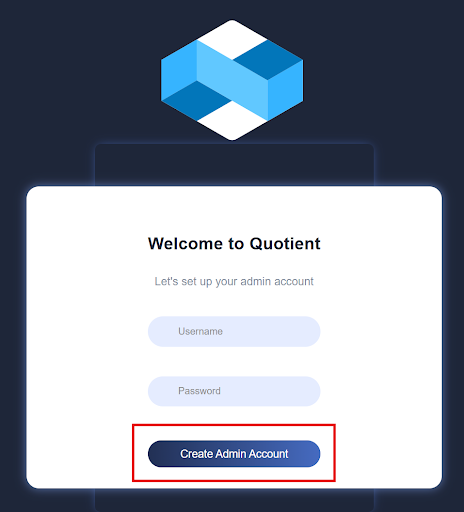
Create an admin account within the Quotient application by specifying the username and password and click on create admin account button as shown above.
Step – 6 : Configuring your database connections within Quotient application
Quotient uses two model paradigms to handle database connections. A connection profile is how we define high level database connections including account and authentication information. SQL interfaces define database level, schema level, role, and warehouse usage. Quotient is designed to use multiple SQL interfaces depending on the type of queries the app generates. E.g., Machine Learning, General Compute, and Persistence.
We currently provide preset defaults for our connection profiles and sql interfaces that you can load into Quotient and fill in your required settings.
Within the Quotient UI, access the Jupyter notebook by clicking on the button shown below. This opens the Jupyter dashboard in a new browser tab.
In Jupyter, open a new terminal by clicking on button shown below.

Within the terminal window, please execute the below commands:
bash
cd /app
python3 viewer/manage.py loaddata viewer/fixtures/spcs_connection_profiles.json
python3 viewer/manage.py loaddata viewer/fixtures/sqlinterface_spcs_stable.json
After the defaults have been loaded we can begin to configure the connection details:
Python
# Within the same terminal window run the below commands
python3 viewer/manage.py shell
# Import the required connection management models
from api.models import ConnectionProfile, SqlInterface
# Load the snowflake preset profile
snowflake_profile = ConnectionProfile.objects.get(profile_name="snowflake")
# You may see a comprehensive list of available fields to configure via
snowflake_profile.__dict__
# For now we only need to set up the username, server (account), and password
# The username and password (and security key if used) is encrypted within the
application for your security, therefore these two fields are configured
slightly differently than the other fields
snowflake_profile.set_username("your_username")
snowflake_profile.set_password("your_password")
snowflake_profile.server = "your_server" # Note - Server is the snowflake
account locator
snowflake_profile.save()
Copy the python commands and paste them into the terminal and click enter to execute them
Once the connection profile is set-up, you may configure the SQL interfaces. Please follow the below steps.
Please return to the Quotient homepage and append ‘/admin’ to the URL. For example, if your URL for the app is -> jpe4abqu-kynhxfe-sfs-scs.snowflakecomputing.app, Then navigate to -> jpe4abqu-kynhxfe-sfs-scs.snowflakecomputing.app/admin. This will bring us to the administration panel.
The django admin panel would look something like below screens
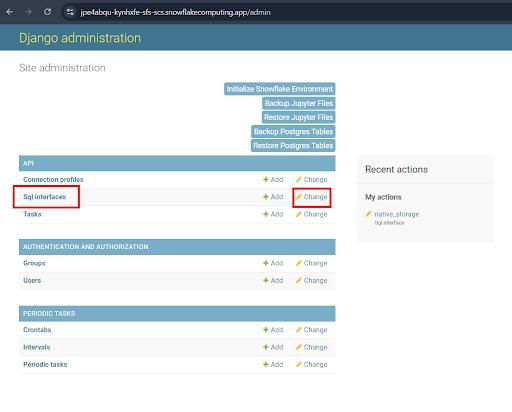
Within the admin panel, click on the change button next to SQL Interfaces section as shown above. This would redirect to the below screen
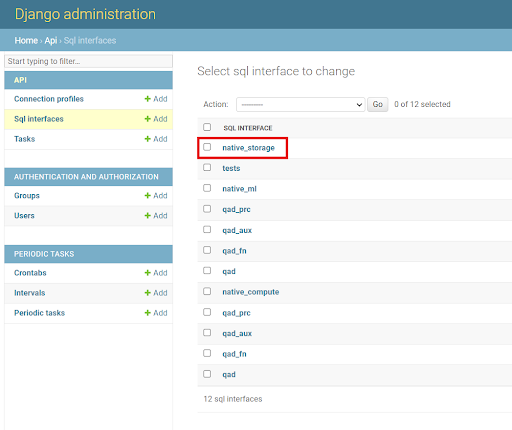
Click on “Native_storage” interface as shown above and the below screen should be visible
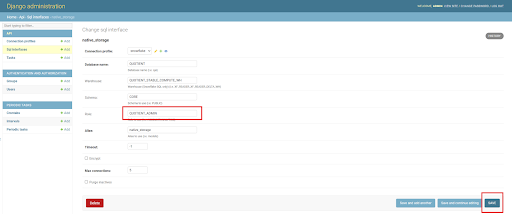
Notice how the Connection profile dropdown displays “snowflake”. This means this SQL interface applies to the Snowflake profile we just created.
Edit the Role section as shown above, ensuring that you select a role granted to the Snowflake user configured in the previous step. Once this is complete, save the interface settings. Please repeat these steps for the other SQL interfaces that apply to the “snowflake” connection profile. Additionally, please ensure that the Database name for the sql interfaces: qad _prc and qad corresponds with the LSEG data share that was added to your account in the earlier steps.Once all the above steps are done, please restart the service through the Streamlit UI as shown in the next step.
Step – 7 : Restart the service through Streamlit UI
In order for the connection profile settings to reflect, restart the service by clicking on the restart service button from Streamlit UI as shown below


After successfully restarting the service, Please wait for 1-2 mins and check the service status as shown below:
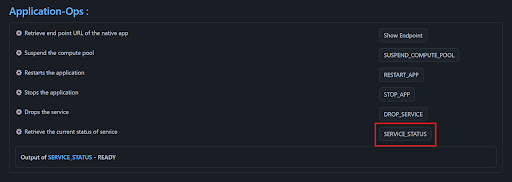
Once the service is READY, Navigate to the endpoint URL which is open in the other tab in the browser. In case of any 502/503 error, please wait for a couple of minutes and refresh the tab to see the Quotient UI as shown below:

Once the connection profiles are successfully configured, the shared data section becomes visible in the application. This shared data section contains multiple fields like FX, MKTCAP (Market cap) etc, which can be accessed by the end user.
Step – 8 : Verifying the setup
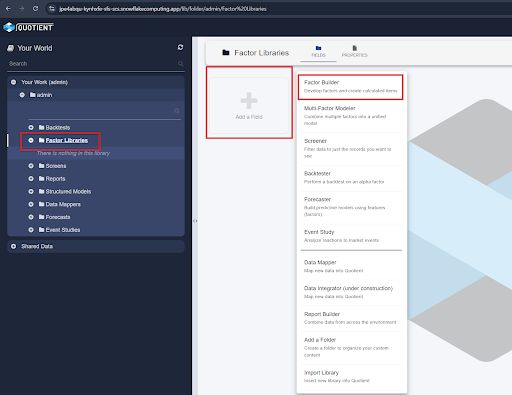
In order to verify all the above steps, let’s go ahead and create a sample factor. To create a factor, navigate to the Quotient application tab and click on “Factor Libraries”, “Add a field”. Select “Factor Builder” from the menu, as shown below:
Once done, you should be redirected to the below screen:
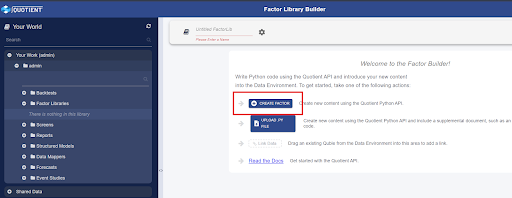
Click on the Create Factor button as shown above. Provide a name for the Factor Library and a name for the individual factor. We used “TEST_FACTORS” and “Factor-1” for this example. Replace the contents of Factor-1 with the code provided in the block below, then click Save to save the factor.

Python
import pandas as pd
df_2d_2v = pd.DataFrame({"QAID":['AAPL','IBM','GE'],'Dates':['2024-01-31','2024-02-29','20 24-03-31'], 'Values_':[100,200,300]})
q_2d_2v = Quble(df_2d_2v, valuespace=['Values_'])
return q_2d_2v
Once saved, you can close the factor. This will take you back to the library screen, where the newly created factor will be displayed, as shown below.
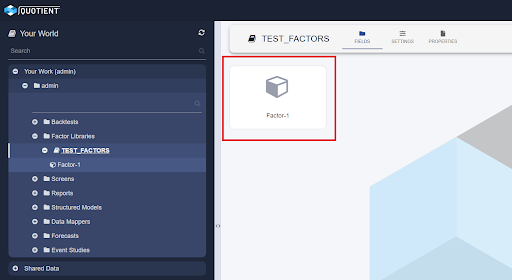
Click on Factor-1 (as shown above) to build it. Once the factor has been built, the below summary will be visible
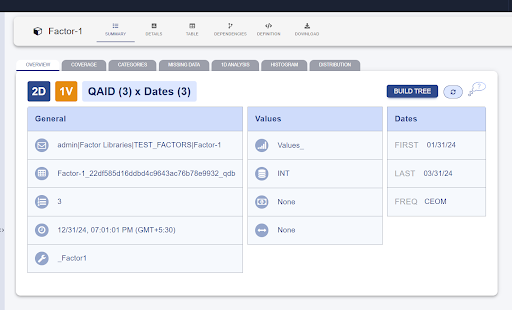
Additionally, you can also view the data by clicking on the details or table tab within the factor as shown below

With the factor successfully built, the application and Snowflake connection details are now configured correctly, making the app ready for use.
Discover the future of financial data analysis
Watch a demonstration of Quotient™, our flagship financial data analysis product.
